I’ve made a
big tutorial while I painted my latest hirdmen unit, step by step pictures with
lots of detail shots.
Bare with me here and please read throe all the steps. If you got any questions or anything you think I didn´t explained good enough, don’t hesitate to ask and I will try to answer your question and update this tutorial.
Bare with me here and please read throe all the steps. If you got any questions or anything you think I didn´t explained good enough, don’t hesitate to ask and I will try to answer your question and update this tutorial.

I will here show a standard size unit according to the “Hail Caesar” rules. The miniatures are a mix of different manufacturers but are mostly from Gripping Beast.
First some
notes on the aim on this tutorial. I will here try to explain how I paint a
unit of my Norsemen. This standard will not win you any painting contest but
the aim is to get a descent looking unit in a rather short time to game with.
As some of the pictures are taken late at night and the light sources varies greatly from picture to picture because of this some pictures will be better or worse then others.
One philosophy
or technique I will try to use is watered down paint. By adding some extra
water to the paint the paint will run smother, make a thinner layer and will
not cover up so much of the color under. This will make a sort of ink or wash with
your regular paint that will work with the model sculpt instead of against it.
This could create a miniature that will look to bright for your taste in the beginning
but we will fix that later on with some regular washes.
I will
paint the miniature in what I call a batch painting technique. I paint one
color on all the miniatures before I change color, working throe the unit one
color at the time. This is not the most fun way of painting miniatures but it
will save you lots of time.
This is the
first time I have painted such a large unit in one go as this and I tested some
new ways of making a standard. So some things are tried out for the first time
just for this tutorial.
Wish me luck…
Wish me luck…
Ok, now we
start.
Remember to always mix in some water with your paint, I will not write it down on every step as I almost always do it here.
Remember to always mix in some water with your paint, I will not write it down on every step as I almost always do it here.
After the
cleaning up of mold lines and gluing the plastic miniature together I glue all
my miniatures on “assembly lines”, some pieces of wood. This will make the handling
of the miniatures easier and quicker.


After a white primer I start with a dark gray paint on the chainmail. I use
Panzer gray from Vallejo, seriously this is thee best color ever. I use it for
so much. GET IT...


Next step
is a basic skin color mixed with some water. I used Flat flesh, 70 955 from
Vallejo.


I also painted some beards and hair while I was at it.


You can
never go wrong with green on a Dark Age unit. I here started to include some
shield patterns.


Next step
was a new greenish color.


But as I wanted
some more color on the unit blue was the next one. Ive stared on some striped
pants on some of the miniatures also.
The lines
are far from perfect but that’s okay for now. We will fix that later on, don’t waste
time on that now.


Next up was a sort of orange color, Vallejos – Light brown, 70 929


A darker
red color was the next color I picked. Notice how the mixture with water thins
the color down so you can see the strings on his leggings. Maybe a little to
water deluted but It will work in the end.


Next color
of choice went for a sort of yellow-brown color, Vallejos - Midle stone (I think,
the text is barely readable) 70 882.

While
taking the picture on the now yellow strings on the leggings I noticed that I
have missed to paint his hand. Doh.
You could fix such things now or you can fix such things later on if you for example are using a light brown and thus use it on the hand with some extra water, we will wash and highlight it with the rest of the skin later anyhow.
You could fix such things now or you can fix such things later on if you for example are using a light brown and thus use it on the hand with some extra water, we will wash and highlight it with the rest of the skin later anyhow.


Green is
nice. By now Im gething a fairly good idea on how my miniatures are going to
end up. But I could always add a color or two to mix up the color palette used.


A sort of red-brown color was used on some of the leather work, some belts a skin and
such. By using diffrent amount of water you get diffrent colors with the same paint.


A darker
brown, more leather work. Some sides of the shields. A beard or two.

A lighter
yellow color was used to includes some blond haired Vikings.

Some bright red was here used on some shields and some other details. I try not
to use it on clothes as I think it’s a too bright color for that but I love the
effect it gives the unit to include some colors that really pop.

A start on
a red raven design

Some shield
patterns and a red stripe on his (and some other miniatures in the unit) tunic.

More bright
red stripes and dots on the shields and tunics.


Cover more or less the whole miniature with some water deluded Strong In. If you have some white or
some of the blue colors under you should be a little more conservative and just
paint the places you want to tone down, the places you want a more darker, a
more shadowed effect on.

Many people
painting miniature I have seen stops here. This will unfortunately create a
sort of brown looking, rather dull and bland looking unit. What you need is
some highlight to really make the unit pop.


What you
want to highlight is the nose, the cheeks, forehead, finger and such.

I like to use white as this will really make the unit look bright, a nice contrast to sometimes darker miniature.


A close
shot on a shield after the Strong Ink and now the white color.


Around the nose maybe, between the fingers. And I use it where the skin “ends” and maybe a tunic or chainmail starts.
This red ink will make the miniature look more alive.
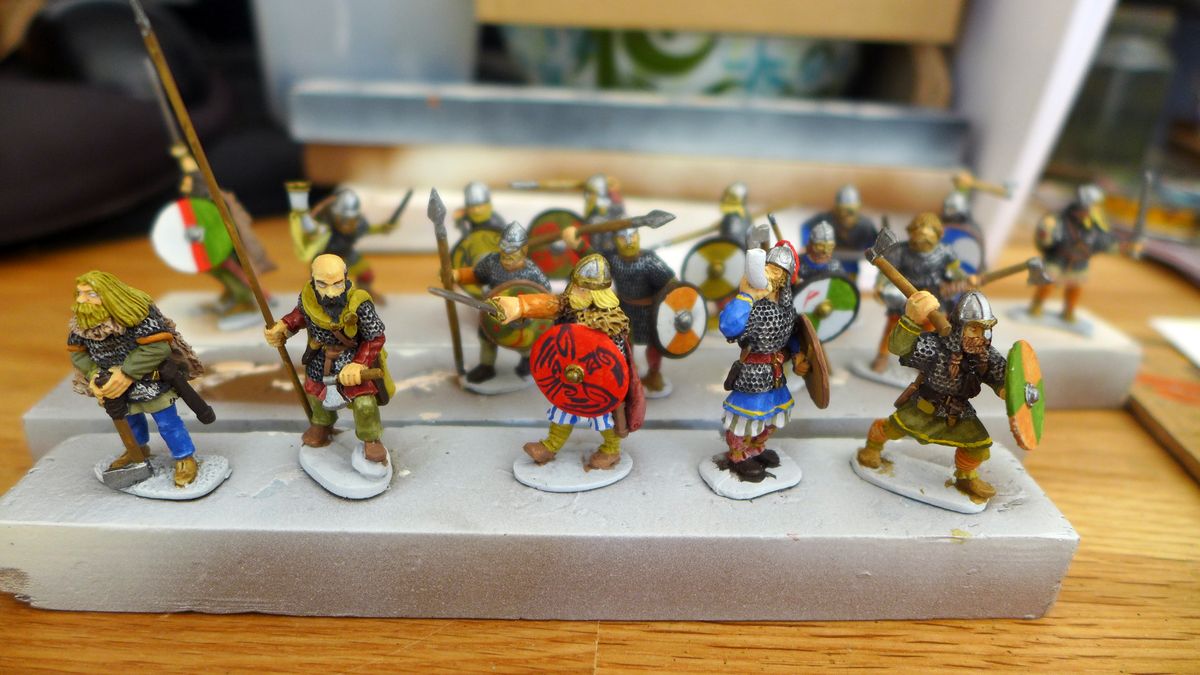
Its time to
start on the bases.

For this unit I will us multi bases as I have started to like it more and more.
I will use two 40x40mm bases that I got with the plastic hirdmen and a 80x40mm that I cut from a plasticard. I start with a knife and making small cuts in the bases on both sides. On the downside my theory is that it will get a better grip and not slip down from an hill or such and on the upper side its done so the miniatures and the basing material will get a better grip when gluing.
I will use two 40x40mm bases that I got with the plastic hirdmen and a 80x40mm that I cut from a plasticard. I start with a knife and making small cuts in the bases on both sides. On the downside my theory is that it will get a better grip and not slip down from an hill or such and on the upper side its done so the miniatures and the basing material will get a better grip when gluing.
The hird arranged
on the bases and glued.


Now its
time to move down to the basement where I keep my basing material. I will use a
old brush and some Woodglue. I think some of you will call it white glue or PVA
but I’m not sure if it’s the same so I will continue to call it wood glue here.


I like the varying sizes of the sand grains it gives me.


By using a water eluted paint I get the natural color variations of the sand to shine throe for free.


The theory behind it is at least that you should mix all kinds of stuff into it. Different brands, sizes and colors of flock and other basing material, twigs and dried leaves from outdoor and I also include some grass clipping from my lawn in to the magical potion of basing material…
Let’s start with the banner for the Merkismaðr to carry. This is the first time I try this technique but fortunately it worked.


After Im satisfied with the overall design drawn with a regular pencil on a
piece of paper I fill in the lines with a marker.

This will show on the other side of the paper.


A dark green was then added.

Next up was a light gray. It was used to clean up some of the black as
well as creating some shadowing effect on the white paper.

Next step was a white color to brighten up the banner some and to create
a more interesting area around the serpent.

A bright red color was chosen for
the eyes.


And here we have it glued to a long spear.
And that was it.
What we have here is a whole unit of Norsemen in a rather short time but that still look descent enough. I have only used two inks and highlighted only the skin and the white on the miniatures.
What we have here is a whole unit of Norsemen in a rather short time but that still look descent enough. I have only used two inks and highlighted only the skin and the white on the miniatures.
And now it is time for some group pictures of the complete unit with my backdrop
for that little extra touch.


I hope that this tutorial will help and inspire you guys and girls out
there.
As this tutorial have taken LOTS of time to make, (taking pictures
between each step, writing this tutorial and such) I would love to hear what
you think of this way of painting miniatures.
The theory at least, is to start with a white primer and by delude the
paint with water to let the sculptor help you paint the miniature.
I wish you the best of luck with trying this out. Well maybe on a smaller unit to start with.
Regards// Jonas
Edit 2016-01-15:
Looking back at this post with a fresher sets of eyes I think I should have used more times on details. The metal helmets could need a gray/blackish wash in the cracks, more highlights on the clothes and so on. I now paint units on a higher standard and click the "Viking" tag to see some of my more recent work and you will see the difference of what more detail work does. This tutorial still fills a purpose I suppose but I would have done some things differently now.
Thanks for a great tutorial! I really like reading these kinds of step-by-step descriptions as you always pick up some new ideas to incorporate into your own way of painting.
ReplyDeleteI'd be very interested in a tutorial on how you paint your trolls and goblins, especially the skin parts.
Oh, and the units look great by the way!
Thanks.
DeleteTroll/goblin skin noted as a future tutorial then.
/ Cheers
Interesting post, always worth seeing how others prepare their miniatures as you can learn something new. Very nice banner.
ReplyDeleteRegards,
Matt
Thank you.
DeleteThis is brilliant! I have some great takeaways from here. I like the idea of taking a single color over the entire batch. I will try chainmail starting on a dark gray (never done that). I also really like the wash dragged on the shields. Great effect. Basing is top notch too. THANKS for sharing!
ReplyDeleteBookmarked and one more thing...your flocking looks a bit like flocking we enjoyed in college. No wonder people would "kill" for it. ;-)
I never told you this flock was cheep... And you get a sort of sweet smell on your miniatures.
DeleteA big thanks for your comments, glad you liked it. :)
ReplyDeleteCould you provide a list of paints you used?
ReplyDeletethanks!
Ohh sorry I dont remember them all.
DeleteI usually uses Vallejo paint but some of them has the text smushet out so some of them aint readable anymore.
Great tutorial thank you. Now all I need to find out is what green plant that really is and does it lose it's colour over time?
ReplyDeleteBy the way have you seen the troll pack available with the ArcWorlde Kickstarter? They seem right up your alley.... so to speak.
Thanks.
DeleteThe green plant may lose colour over time but thats nothing thats bothering me yet atleast. We will see in the future...
Those trolls are really nice. Im not sure I want to join in on another kickstarter just now.
...hang on.... is it lichen that has gone through a food processor or been chopped up?
ReplyDeleteMost of the natural "flock" are just dryed stuff thats been broken up to lesser pieces by hand.
DeleteThanks for that Engel.
DeleteStort tack för att du tog dig tid att publicera detta om hur du målat.Lärde mig mycket. Tack kompis. :)
ReplyDeleteNice photographs. I learnt a lot about figurepainting.
cheers mate!
Glad you liked it.
DeleteHope to see some Russians from you soon...
Greate blog post !!!
ReplyDeleteGreate work on the handpainted banner !!!
Very nice to be able to see how you place the minis on your 40x40 bases..."basningsnoja"...
Best regards Michael
Thanks Michael, glad you liked it.
DeleteThe idea with the bases are that each miniature have an 20x20mm base and a multibase with four miniatures thus have an 40x40mm base, exactly where they are placed on the base doesnt really matter.
On a even larger base this will give me even greater opportunities to rearrange the miniatures to a more living unit and step away from the more commonly perfectly ranked miniatures you get with using single bases.